Beer Making Kit Near Me(Review 2023) – The Complete List 10 types of Beer Making Kit Near Me
It’s pretty hard to beat the feeling you get from sipping an ice-cold beer after a tough day’s work but tasting the fruits of your own labor might just do it. It’s one thing tucking into your favorite craft beer, but it’s even better when you’ve mastered the art of brewing yourself and know exactly why the beer your drinking tastes the way it does. The good news is brewing your own beer is easy to do and will save you serious bucks!
You might want to see this first: Best Beer Homebrewing Kit.
In this post, we will take you through everything you need to know to get started brewing your own beer from the ingredients to the instructions. Getting down to your local brewing shop is a great place to start so once you know what you’re after you can check out our ‘where to buy beer making kit near me’ tool below. You’ll be a master in the art of making good old homebrew in no time!
Getting started brewing beer
A great way to get started with brewing your own beer is by investing in a home brewing kit and a good book on how to brew beer. Charlie Papazian’s enjoyable ‘The Joy of Homebrewing’ is entertaining, well written, and good for the beginner or enthusiast alike thanks to the passion he has for brewing great beer. The other thing to remember is that you are going to need to learn about the 4 key phases to brewing beer, namely: preparing your equipment; brewing; fermenting, and; bottling!
Preparing your equipment
Before you get started you’re going to need to gather together your beer making equipment or unpack your beer making kit. Either way, the items you will need are:
#1 Sanitizer:
When brewing your own beer this is one of the most important factors that should not be overlooked. Everything you use that comes into contact with your homebrew once the boiling process has been completed needs to be sanitized. If you don’t do this, your homebrew is unlikely to be successful.
#2 A brew kettle:
These look like a huge tea urn, or can also just be a big saucepan depending on your budget. Most kits won’t come with a brew kettle so it is important to bear that in mind when you choose which kit to go for if you need to save some money for a brew kettle. A top tip for buying brewing kettles is to go bigger than you think, especially if you are going to be getting into all-grain brewing, as a bigger kettle means a reduced likelihood of boil-over when making your wort.
#3 A strainer:
Whilst it is not strictly speaking necessary to strain out your hops and sediment before fermentation many people prefer to do so to protect the fermenter form filling up with lots of gunk that may (or may not) cause issues with flavor (that subject is up for a long debate). You can either use a funnel and a mesh strainer or just work with hops that you boil in a bag which leaves little to strain anyway. Just remember to sanitize everything you do use if you are a believer that straining your beer before fermentation makes it taste better.
#4 An auto-siphon:
When choosing a beer-making kit you should try and choose one that has a big auto-siphon. The majority of starter kits will come with a siphon that is just 5/16ths of an inch but kits with a ½ inch siphoning cane will save you a whole world of time when transferring your homebrew from brewing kettle to primary fermenter and, subsequently, from fermenter to keg. These can also be bought separately at around $14 if you like the sound of a kit but have noticed the narrower auto-siphon.
#5 A fermenter with an air-lock:
A fermenter with an air-lock allows carbon dioxide produced during the fermentation process to be released without allowing outside air into your fermenter. You don’t want air getting into the fermenter since this allows oxidation to happen and will ruin your brew, just as opening a bottle would do if you left it overnight. It’s also a good idea to use a blow-off tube even if you have a fermenter with an air-lock as the fermentation process can produce a lot of CO2 that can actually overwhelm your airlock. This is particularly true for larger brews.
#6 A decent-sized stirring spoon:
You will need a spoon designed for brewing as it needs to be both long and strong. Ideally, you would choose a steel spoon thanks to this material’s strength, but a plastic spoon that is heat resistant and safe to use with food is also a good option. The authentic wooden paddle may be tempting but wood is much harder to sterilize and can introduce unwanted bacteria into your brew if you are not careful.
#7 Ingredients (or a pre-made recipe kit if you prefer):
Obviously, with thousands of recipes out there for beer, ingredients will vary. However, ultimately, you will need some hops, some malt syrup, some sugar, some yeast, and some water – OR a starter kit (plus water).
How to brew beer
The key part to good beer is getting the brew right. This is the stage of the process where you can make minor adjustments to your recipe and create a whole new kind of delicious craft beer. The first thing you will need to do is steep your bagged grains in your brewing kettle for 20 minutes. You should add water equivalent to half the capacity to avoid spillage and to take account of the space the grains take up and make sure not to take the temperature above 170 Degrees Fahrenheit.
If you steep your grains in water that is too hot you will draw unwanted tannins out of the husks which will lead to unwanted flavors in your brew. You should also aim for around 2-liters of water for every 454-grams of grain as this ratio allows the grains to bring the pH level of the water down and again helps to prevent unwanted tannins getting into your brew. You want your mixture to have a pH level a little below 6.0 if possible.
Once your grains have been steeping for 20 to 30 minutes take them out and allow the water to drip out of the bag without squeezing it (that’s right, this will keep out tannins!). With the grains out of your kettle, you can now bring your brew to the boil. Once it has boiled, remove it from the heat and add your malt extract mixture. Depending on what hops you have you now need to add these to your brew and be careful not to have it boil over if you don’t want a horrible mess.
With your hops, malt and grains all having been added at appropriate times you now have your wort, essentially sugar water, that will be used to make your beer. You want to cool this down as quickly as possible so if you can place your brewing kettle in a container filled with cold water and ice that will be great. You can also buy a wort chiller to do this quickly if you’re really getting into your brewing.
How to ferment beer
Remember to sanitize everything you use at this stage! Once this is done, you can transfer your cooled wort into your fermenter where you add double the amount of water as you added at the initial stage when you were making your wort. You now need to get air into the mix to help the yeast do its magic so give your container a good shake at this stage to aerate your wort. Once your mix of wort and water is well and truly shaken you’re ready to add your yeast into the fermenter.
Remember to use sanitized equipment to do this! It is also a good idea to poor your yeast into a container with a little warm (but not hot) water to activate it first. Once it has been added, seal your fermenter (so long as it has an air-lock to let out the C02 that is going to be generated during the fermentation process) and store it in a dark and cool place. You want the temperature to stay around the 68 degrees Fahrenheit mark to allow for controlled fermentation. Fermentation will be complete after just two weeks.
Why bottle homebrewed beer?
Bottling your homebrew helps it to carbonate faster and turns a flat brew into a crisp tasting fizzy one. However, it is important to ensure that the fermentation process is completely finished before bottling your beer if you don’t want a load of beer bombs going off in your kitchen! To check fermentation has stopped you will need to use a hydrometer and take readings for a couple of days to check the gravity has not changed. You can taste your beer now too if it tastes a bit sweet, it probably needs more fermentation.
Once you are sure your beer has finished fermenting you can bottle it up. The yeast will continue to produce C02, so in an air-tight container it will be absorbed by the beer in your bottle soon turning into a bubbly brew instead of a flat ale. Make sure you use bottles that were made for carbonated drinks too to ensure you don’t get shocked by a nasty explosion. You’ll also need some priming sugar, a siphon, and a bottle capper. Once filled the bottles are ready for use after just 2 weeks!
Delicious Beer Recipe
Now you know the basics, you need to know a recipe to really get the taste buds quivering. This recipe for a delicious brown ale is a great one to get you started.
#1 Ingredients
– 19 – liters of water
– Specialty grain mix (milled):
– 12-ounces of Chocolate Malt
– 8-ounces of Medium Crystal Malt
– 8-ounces of Caramunich
– 9-pounds of Maris Otter
– Hops:
– 28-grams of Hallertau hops
– 28-grams Liberty hops
– 28-grams Crystal hops
#2 Instructions
#1 Add your grains along with 3.4 gallons of water to a big pan and bring to 165-degrees Fahrenheit for 60 minutes, stirring regularly.
#2 Use a sieve to ‘Vorlauf’ your grains into a second pan until their runoff begins to become clearer.
#3 Sparge (run water over) these grains with a further 4 gallons of water.
#4 Add this mix to your brewing kettle.
#5 Boil for a further 60 minutes, adding your Hallertau hops for the full 60 minutes, half the Liberty and Crystal after 10 minutes.
#6 Chill your wort.
#7 Aerate your wort and prepare your yeast with a little warm water.
#8 Ferment for 1 week at 65-degrees Fahrenheit.
#9 If possible, reduce the beer temperature to just 35-degrees Fahrenheit and add the remaining Crystal and Liberty dry hops for 5 days.
#10 Bottle or keg your beer being careful to strain out the hops!
Top 10 Beer Making Kit Near Me 2023
Choosing the right kit is not always easy without a little help from someone in the know. Here we will outline a few of our favorite beer brewing kits that are great for beginners, enthusiasts, and people with specific tastes. Also, don’t forget to check out our handy tool to find where to buy a beer brewing kit near you as going in-store is a great way to pick up even more handy tips on how to make the perfect homebrew.
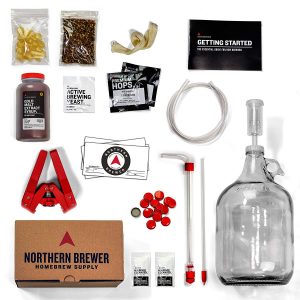
#1 Best Beer Brewing Kit for Beginners: Northern Brewer’s Irish Red Deluxe Homebrew Starter Kit
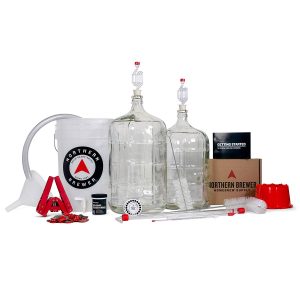
If you’re after a brewing kit suitable for the absolute novice brewer, then this kit is a great one to help you become a confident and competent home brewer! With 2 carboys (large fermenting bottles), an air-lock, auto-siphon, tubing, bottling bucket, and spigot, as well as the ingredients for an Irish Red ale, this kit has pretty much everything you need for your first brew. For those new to brewing, this kit will give you a real boost.
Other good things about this kit are that: the 2 carboys make it quicker and easier to prepare your multiple batches; the instructions are pretty much fool-proof so you can be confident of brewing success, and; it comes with a thermometer and a temperature gauge to improve your control over the brewing process. The downside of this kit is you will still need to invest in a brewing kettle to prepare your wort in, stirring spoon, and a decent strainer.
#Beer_Kit #Irish_Ale_Kit #Beer_Starter_Kit #Brewing_Kit #Ale_Kit
#2 Best Brewing Kit for Stout Lovers: Craft a Brew’s CMS Home Brewing Kit for Make Your Own Chocolate Milk Stout
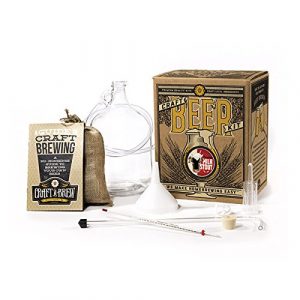
For those ale lovers that are after a truly dark stout, this kit will be just the ticket although the 1-gallon carboy will require you to be making multiple batches at any one time if you are someone who likes to regularly sink a few jars! Complete with funnel, carboy, racking cane, airlock, thermometer, recipe, ingredients, and more, this kit helps you get to grips with making small batches of your own beer at home.
Other things to like about this kit are that: it truly creates a chocolatey stout with the beautiful subtle creaminess you would expect from a professionally crafted milk stout; it is fully packaged in the USA; you can brew this in a big pan without having to invest in a brewing kettle, and; it is great value. The downside of this kit is that it is so small, so if you do get into brewing your own you are likely going to have to replace most of the equipment it comes with pretty quick.
#Stout_Brewing_Kit #Beer_Brewing #Stout_Brewing #Stout_Kit #Brewing_Stout
#3 Best Beer Brewing Ingredients Kit for a Classic Ale: Brewer’s Best’s American Cream Ale Homebrew Beer Kit
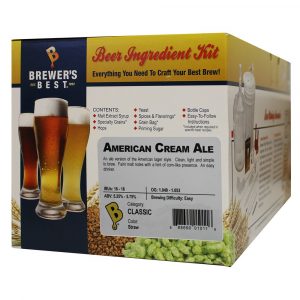
If you’ve already invested in all the kit you need to actually undertake the brewing and fermenting process and are simply looking for an ingredients kit, then you’ll love this classic creamy ale set. At just 16-18 IBU, this lightly bitter ale is crisp and creamy to taste and will take you into the heart of an English pub with the way it makes you feel. This beer is truly an easy drinker so be warned, you will be through this 5-gallon batch in no time!
Other pluses of this ingredients kit are that: it is suitable for a 5-gallon batch; it uses Nottingham ale yeast which means you don’t need a specialist fermenter for the fermenting stage; it includes hops, malt extract, and specialty grains as well as a grain bag, bottle caps, and priming sugar for bottling, and; it has excellent instructions. The downside of this kit is it that it is only ingredients so you will need your own equipment to turn it into an actual brewing kit.
#Creamy_Ale #Creamy_Ale_Kit #American_Ale_Kit #Brewing_Ale_Kit #Ale_Brewing_Kit
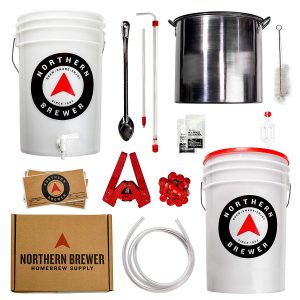
#4 Best Beer Brewing Kit for Brewing Enthusiasts: Northern Brewer’s HomeBrewing Starter Set With Block Party Amber Beer Brewing Recipe Kit And Stainless Steel Brew Kettle
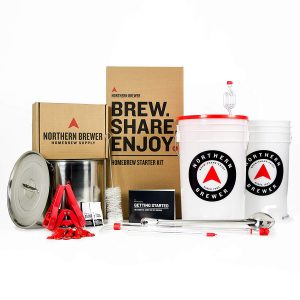
For those who know from the outset that a small brewing kit is not going to cut the mustard, this 5 gallon set will do just the trick. The best thing about this kit is that it really does have everything you need with even the brewing kettle included along with all the other usual items you would expect in a starter kit, from air-lock fitted fermenter to the ingredients for a deliciously drinkable amber ale to christen your barrels with.
Other pros of this kit are that: it comes with equipment big enough to brew 50 bottles of 12-ounce beer in your very first batch; it uses premium grains, malts, and exceptionally aromatic hops; it is great value considering it includes a brewing kettle which many starter kits omit, and; it also comes with a handy bottling bucket along with other necessary bottling equipment. The only negative about this kit is that they don’t include a stirrer which is a bit of an annoying omission.
#Amber_Ale #Beer_Kits #Beer_Brewing_Kits #Amber_Ale_Kit #Ale_Kits
#5 Best Small Brewing Kit: The Caribou Slobber Brown Ale 1 Gallon Craft Beer-Making Starter Kit
If you don’t plan on tucking into your homebrew every night and are happy to just brew up a small batch to pull out of the cupboard on special occasions then this is the kit for you. The 1-gallon fermentation jug is still big enough to fill 10 12-ounce beer bottles whilst the Caribou Slobber Brown ale is truly a phenomenally tasting ale that will wow guests when you tell them you were the one who actually made it.
The other things that make this a great kit are that: so many people have used it and so many people absolutely love it and plenty of forums have tips to make the most of it; it is a portable kit that can easily be transported to a party or special occasion, and; the fermenting jug is made with clear glass so you can easily monitor your brew. The downside of this kit is the lack of a brewing kettle and the fact it doesn’t include bottles even though it claims to include everything you need.
#Delicious_Ale #Beer #Brewery_Kits #Ale_Kits #Beer_Making_Kit
#6 Best Large Brewing Kit for Beer: Craft a Brew’s premium Homebrew starter kit with 6.5 gallon fermenter
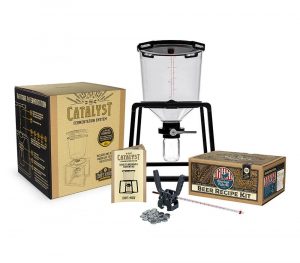
For the big-time drinkers out there, this should be the starter kit of choice as it has plenty of room for huge batches that are going to make it easy for you to create a huge cellar of bottled beer that you have handcrafted yourself. The special design makes it easier to brew your beer and the fermentation process is also sped up thanks to the conical design and handy stand which comes included with this kit.
The other pluses of this starter kit are that: the ingredients and instructions will guide you towards a delicious American Pale Ale that will be a hard brew to beat; the design makes it easy to clarify your beer and remove sediment before you begin the bottling process, and; it is perfect for beginners but is also big enough to suit enthusiasts’ needs. The downside is that it is made of plastic (albeit BPA and polymer-free) and does not include a brewing kettle.
#Brewing_Kit #Pale_Ale_Brewing_Kit #Beer #Pale_Ale #Pale_Ale_Brewing
#7 Best IPA Beer Starter Kit: Mr. Beer IPA Edition 2 Gallon Homebrewing Craft Beer Making Kit
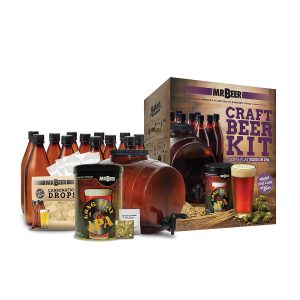
Indian Pale Ale (IPA) is a deliciously hoppy pale beer which is a firm favorite amongst many beer lovers. It can be a little tricky to make yourself but with the help of Mr. Beer, you can confidently brew your way to an incredibly delicious and refreshing beer to enjoy at home. In this IPA Edition of the Homebrewing Craft Beer Making Kit from Mr. Beer, you will be provided with everything you need to make a premium ale in a single box.
Included in the set is a unique 2 gallon fermenter designed by Mr. Beer (also known as the Little Brown Keg). This fermenter has a built-in airlock, is UV resistant, and even has a spigot attached so bottling your beer is incredibly easy. The wide-mouth top also makes transferring your wort into here straight forward and makes cleaning a breeze. Mr. Beer even provides the bottles to decant your beer into when it’s ready so this kit really does deliver its out-of-the-box beer experience!
#Mr_Beer #Homebrewing #IPA #Pale_ale #Hoppy_ale #Fermenter #Bottles #Box_kit
#8 Best Amber Ale Beer Brewing Kit: Northern Brewer 1 Gallon Craft Beer Making Starter Kit (Smashing Pumpkin)
To all you amber ale fans out there who are interested in making your own beer then this could be the beer-making kit for you. With this set, you can make 1 gallon of Northern Brewer’s delicious Smashing Pumpkin amber ale which is infused with a mixture of spices including cinnamon, ginger, and nutmeg. They will provide you with all of the ingredients to make the ale as well as a full set of instructions on how to make it.
This set also includes a glass fermentation jug to transfer your wort to once it has been boiled – this fermenter includes a cap and airlock to make sure that your precious beer stays safe from infection as it ferments. Northern Brewer also provides you with sanitation equipment, bottle capper, and caps. The only thing you will need extra is the stockpot to brew up your ale in and some bottles to fill up when the beer is ready! With 1 gallon of beer, you will fill around 10 bottles – a great way to start on your craft brewing journey.
#Northern_Brewer #Craftbeer #Brewing #Homebrew #Craft #Drinking #Amberale #beeroclock #pint
#9 Best Wheat Beer Starter Kit: Brooklyn Brew Shop Afternoon Wheat Beer Making Kit
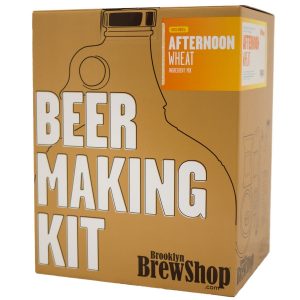
On a hot summers day, a refreshing wheat beer is hard to beat. But have you ever thought of making your own beer from the comfort of your own home? Well, with this beer making kit from Brooklyn Brew Shop you can. Included in this set are the ingredients to make 1 gallon of their Afternoon Wheat beer (grain, hops, and yeast) and an easy to follow recipe to take you step by step through the process from wort to bottling. This floral wheat beer is irresistible and the perfect beer to have stocked in your fridge for hot sunny days.
Not only that, but included in this set is also all of the equipment you need to make the Afternoon Wheat beer. In the box you will find a glass fermenter, thermometer, airlock as well as a bunch of other equipment you need for brewing. You will require your own stockpot for creating the wort for this beer but it is likely that you will have one of these already in your kitchen. A superb beer making kit that you could treat yourself to as the start of a new hobby or perhaps give as a thoughtful gift to a friend.
#MakeSomeBeer #BrooklynBeerShop #Afternoon_Wheat #Wheat_Beer #Homebrewing
#10 Best Brewing Kit for the Serious Brewer: Northern Brewer – Homebrewing Starter Set, Equipment and Recipe for 5 Gallon Batches (Hank’s Hefeweizen)
While this huge brewing kit may look a little daunting to a beginner it is, in fact, designed to be accessible for first-time brewers and delivers well on its promise. Providing you with everything you need to get started in brewing including a recipe kit for Northern Brewer’s Hank Hefeweizen beer. This is a delicious Bavarian beer which is golden in color and packed with a range of flavors from clove to fruity banana. A refreshing choice of beer to sit back on a sunny afternoon and enjoy.
With this kit, you will be able to make a lot of beer – 5 gallons worth to be precise. Included in the set is a 6.5 gallon fermenter with a lid and airlock, bottle filler, 5 gallon stainless steel brew kettle as well as sanitation and bottling equipment. You will also receive a full set of instructions and links to online videos to help you through the brewing process. This is a great company to use for your first brewing experience and come highly recommended!
#Homebrew #Homebrewing #Bavarian_Beer #Makeyourown #Craftbeer #Pint #Enjoy
Conclusion
Brewing your own beer is not only fun but is also a great way to save money if you love sipping on craft beer. The best way to get started is to invest in a kit that comes complete with everything you need and you’ll find a range of options to suit different needs and tastes on this list. Once you’ve got to grips with the basics it’s a good idea to move to an all-grain brewing method to really get to grips with how to get the flavors you love into your delicious homebrew.
You’ll find these kits above are easy to follow and all make a range of tasty craft beers that your friends will think have come from a professional brewery if you follow the tips above. So, now you know how to do it, all that’s left is to go out and get the kit and put on your brewer’s cap! Happy brewing!
See more maybe you are interested here.