Best Wort Chiller(Review 2023) – 2 benefits will make you irresistible!
With over a million Americans now brewing their own beer, now is as good a time as any to join the party and brew your own beer too. However, when you’re starting out there are so many new words, bits of equipment, and processes to get your head around that it can be easy to be put off from taking part. We’re here to try and help prevent that happening and to give you the confidence to get past the first hurdle and start brewing your own beer.
You might want to see this first: Best Bottle Filling Equipment.
In this post, we will take you through what wort is (essentially the key ingredient to make your homebrew), what a wort chiller is, the benefits of using a wort chiller, how to use a wort chiller, and how to pick the best wort chiller for your needs. Understanding how to get the most out of your wort is the key to making good beer so don’t be put off by the unexciting sound of the name!
What is wort?
Before we start fermenting our beer we have to do a whole range of things, with the most important of these probably being the making of the wort. Wort is the liquid that you extract from the grains you use to make your beer and gives your beer its main essence and essential flavors (from grains and hops as your recipe indicates). At its heart wort is the thing that gives your beer life, body, and soul.
Wort is made by creating a malty liquid by converting starch stored in grains into sugar by a process called mashing. Mashing involves cracking or grinding the husks of grains (usually sprouted barley) and then mixing this with hot water. This is then steeped at around 165 degrees Fahrenheit which allows enzymes to convert the starch in your grains into sugar. This sugary liquid is your wort.
#1 Lautering your wort
Once you have made your wort you then need to do something called lautering. This entails separating your grains and their husks from the liquid component of your wort. Because the words wort, mashing, and lautering can be off-putting, some homebrewers actually jump over these stages altogether by buying ready-made liquid malt extract (what your wort will become). However, this approach gives you almost no control over your beer’s flavor!
The word lauter is derived from German and roughly translates as “to rinse off” or, perhaps, can also be translated as meaning “to purify”. This can be done in the same vessel that you have made your wort in so long as it has a false bottom, manifold, or braid. For a good lauter you need your grain husks to be coarsely crushed as the husks can act as a filtration system. Obviously, your grains should still be crushed enough to allow for efficient extraction.
#2 Sparging
If all that wasn’t enough, making your own wort then requires something called sparging, effectively the final lautering stage. Once the water is running clear off your grains during the lautering stage, you are ready to sparge. This involves sprinkling your grains with hot water and capturing the runoff sweet liquid that comes through – this is the wort that you are capturing here.
#3 The Boil
Now you have your wort prepared the next step is referred to as the boil. As the name suggests, this step requires boiling your wort in order to remove harmful oxygen and unwanted enzymes and lower the pH of the wort so that you can create the optimum environment for adding your hops.
#4 The Quick Cool Down
The next crucial step of the brewing process is to cool down the wort as quickly as possible. This is necessary in order to prevent your wort from getting infected with bacteria and possibly ruining your homebrew. This needs to be done in around 20 minutes and can be done either by creating your very own ice bath or you could go for the much easier option of investing in a wort chiller.
What is a Wort Chiller and how do you use one?
After several frustrating attempts at using an ice bath to cool down the wort, many brewers make the wise step of investing in a wort chiller. These clever devices can be immersed into your wort to cool it down quickly. They are made out of copper piping, heat-safe tubing and metal fasteners and work through the insertion of cold water into the copper piping. The heat from the wort then transfers into the copper piping and brings the temperature of the wort down significantly faster than an ice bath.
What are the benefits of a Wort Chiller?
There are many benefits to investing in a wort chiller. The first of which is that they significantly reduce the likelihood of your beer being infected with bacteria. When brewing batches of beer of 5 gallons or more it can take a long time to cool your wort down using an ice bath, and beer spending time in a lukewarm state is the perfect breeding ground for bacteria and infection. With a wort chiller, you reduce this risk by a long way and get your beer to the perfect temperature for adding your yeast more quickly.
Another benefit of using a wort chiller to cool your wort quickly is that you minimize the risk of harboring proteins and tannins in your beer because these can make your beer cloudy. By cooling the wort quickly these compounds have the opportunity to be got rid of helping your beer to achieve a much clearer and attractive finish.
Top 5 Best Immersion Wort Chiller Products 2023
The majority of wort chillers on the market are immersion chillers that you place directly in the wort. They are relatively easy to use and don’t have a hefty price tag. In this next section, we review some of the best immersion wort chillers on the market to help you on your wort chilling way.
#1 Best Value Copper Wort Chiller: Coldbreak Brewing’s 12.5 foot Copper Tubing Wort Chiller for Homebrewing
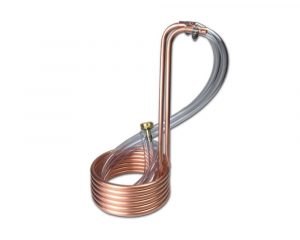
This impressive but simple design makes cooling even larger batches of wort a breeze and thanks to wondrous conductivity of copper you will cool your wort down super quickly with this device. With 12.5-feet of cooling coil and a full 4.5 feet of this being copper this piece of kit has plenty of give and manages to keep the costs down whilst retaining the benefits of using copper to chill down your wort quickly.
Other pros about this copper wort chiller are that: it is suitable for use on up to 6-gallon batches of wort; it is easy to sanitize (use an acidic sanitizer to keep the copper shiny); it is a great price considering the quality and size it is able to cool down, and; it can cool down your wort to pitchable temperature in 10-20 minutes. One downside of this wort chiller is that it has slightly loose connections so you may want to attach hose barbs or compression fittings on the end of the chiller.
#Homebrew #Wort #Wort_Chiller #Copper #Copper_Wort_Chillers
#2 Best Immersion Wort Chiller: NY Brew Supply W3850-CV Super Efficient 3/8 x 50 Copper Wort Chiller
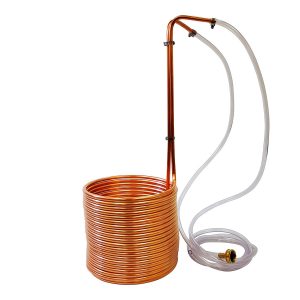
Made in the USA, this wort chiller by NY Brew Supply is of the highest quality and is made with twice the copper of standard wort chillers which ensures its expert efficiency when it comes to cooling down your wort. Constructed out of 50 feet of copper tubing, this wort chiller can be used for batches of wort between 5 and 15 gallons in size so you have lots of room for maneuver when you purchase this wort chiller.
Included with this product is a garden hose adapter, vinyl tubing (that can be cut to the size you need) and stainless steel clamps. NY Brew Supply also provide a full set of instructions so if you are new to the world of wort chillers you will have all of the information you need. The height of the wort chiller is 24 inches and the diameter 9 inches – so make sure this size fits in you brew kettle before purchasing! With this wort chiller, your wort will be cooled in minutes and will save you a whole lot of hassle.
#Wort_chiller #Immersion #Cool_down #Boil #Copper #Wort #Brew
#3 Best Copper Wort Chiller: Home Brew Stuff 25 inch Copper Immersion Wort Chiller
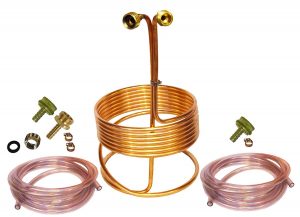
If you’re brewing 5 gallon batches of beer and are looking for a suitable wort chiller for this set up then take a look at this copper immersion wort chiller by Home Brew Stuff. Through immersing this super-effective wort chiller into your wort the temperature will be reduced in minutes and will reduce the risk of your beer being infected and will help to avoid cloudy beer.
In this set, you will also receive two 12 inch hoses, fittings, and faucet adapter so you have all you need in order to get that wort chilling. The height of this wort chiller is 17 inches and diameter 9.25 inches which will fit nicely into a 5 gallon brew kettle. The design of the wort chiller means that the copper coil is elevated inside your brew kettle which makes it more effective at cooling down your wort. Make ice baths a thing of the past by investing in this wort chiller and we’re sure you won’t regret it.
#Immersion_wort_chiller #Copper #Wort #Ice_bath #Homebrew #Beer_making
#4 Best Stainless Steel Wort Chiller: NY Brew Supply Stainless Steel Immersion Wort Chiller

If you would prefer to use a stainless steel wort chiller instead of copper then take a look at this immersion wort chiller from NY Brew Supply. Constructed out of 25 feet of stainless steel tubing the design of this wort chiller means it is elevated inside your brew kettle to make sure that your wort is cooled down as quickly as possible in order to prevent infection. This wort chiller is 16 inches tall and measures 9 inches in diameter and is perfect for chilling 5 gallon batches of wort.
As well as the stainless steel wort chiller you will also receive 12 feet of vinyl tubing which you can cut to the length you need, and the hose adapter which allows you to fit this to your garden hose if you wish to. Help to ensure your beer tastes as good as possible by investing in this wort chiller and also save yourself a lot of time and effort as you will no longer need to create ice baths to chill your wort. A worthy investment and addition to your brewing equipment repertoire.
#Stainless_steel #Wort_chiller #Wort #Cool_down #Heat_reduction #Homebrew
#5 Best High-End Copper Wort Chiller: Northern Brewer’s Copperhead Immersion Wort Chiller for Homebrew
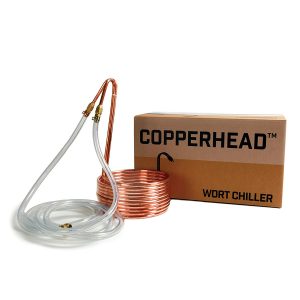
If you are after a copper wort chiller and have a bit of extra cash to play with, then you should check out this great quality bit of kit. With a whopping 25-feet to play with this setup is suitable for cooling down large batches of wort rapidly. The included barbed fittings and hose clamps mean you can always be sure your connections are as tight and secure as they can be so you will not end up contaminating your beer with a leaky faucet with this kit!
Other benefits of this copper wort chiller are that: it also has special ‘drop-angle connections’ designed to ensure no leaks or other contaminants get into your wort as it cools; it comes with connectors suitable for indoors and out, and; it can cool 5 gallons of wort in under twenty minutes and usually closer to 15 minutes. Although they imply you don’t need to sanitize this kit before using it, we recommend sanitizing it anyway as this is best brewing practice!
#Copper_Wort_Chiller #Immersion_Chiller #Homebrew #Home_Brew #Wort_Chillers
Conclusion
Cooling down your wort is a vital step in the brewing process so ensuring this happens as quickly as possible is key to creating a successful homebrew. Creating an ice bath to cool down your wort is fine when brewing smaller batches of beer but as you move to make larger batches a wort chiller will be necessary to ensure that your wort is cooled quick enough to prevent infection. There are wort chillers to suit all budgets and requirements so check out the excellent products reviewed above and select the perfect wort chiller for you.
See more maybe you are interested here.